Fixing a printer paper jam
When working with any printer it's inevitable that you'll encounter a paper jam. Below are the steps you'll want to follow when this occurs.
1. Turn off the printer.
2. Inspect the location or tray the printed paper ejects to. If the stuck paper is visible manually remove it.
3. Remove all paper trays and any paper that may be stuck between the tray and the printer. If the stuck paper is visible manually remove it.
4. Open the printer door that allows you access to the printer ink cartridges or toner and look for any stuck paper. If the stuck paper is visible manually remove it.
5. Turn the printer back on. If you continue to receive a printer jam error try repeating the above steps again. If issue still persist and you see no paper that is stuck in the printer it's likely your printer is experiencing another hardware issues and we suggest contacting the printer manufacturer for additional assistance and/or repair.
To manually remove paper pull on the paper with both hands being careful not to tear the paper while pulling it. If you're unable to get to an edge of the paper that allows you to pull it you may need to manually rotate the gears that feed the paper through the printer.
Preventing a printer paper jam
As mentioned earlier it is inevitable that you will encounter at least one paper jam during the life of your printer. However, if you're encountering frequent paper jams following the below steps can help prevent paper jams from occurring.
1. If your printer has a paper tray do not fill the tray to capacity. If you're encountering frequent paper jams reduce the amount of paper you place in the tray each time it is filled.
2. Make sure you or the tray feeding the paper into the printer is aligned properly and/or the slider used to hold the paper in place in the tray is snug with the paper. Many printers have sliders that allow different types and sizes of paper to be fed into the printer. If the slider is not properly positioned it can cause paper jams.
3. Use standard office paper; folded paper, paper with labels, and specialty paper such as hard bound paper can often cause paper jams. If you're uncertain with what type of paper you should use with your printer your printer documentation will list the types of paper compatible with your printer.
4. Do not mix the types of paper you're feeding into the printer at one time. If you need to change the type of paper or size of paper being used removed any other paper currently in the printer before inserting the new paper.
5. Examine the printer for any previous stuck paper in the printer. Previous paper jams, torn paper, printing labels or other foreign objects in the printer can cause reoccurring printer jams.
NTQP2CP36PPC
Monday, June 28, 2010
Thursday, June 24, 2010
How to Connect Two Computers to One Printer?
Choose your method for sharing the printer. You have the choice of establishing a network or setting up a print server. Setting up a print server requires more hardware in addition to setting up a network, while solely setting up a network cuts down on clutter in your office.
There are the steps to Follow to connect two computers to one printer:
There are the steps to Follow to connect two computers to one printer:
- Connect the primary, or first, computer to the printer. This is done traditionally with a printer cable linking the primary computer to the printer. If this is the first time the computer is hooked up to the printer, be sure to follow the manufacturer's instructions for installation and setup.
- Change the settings on the primary computer to allow sharing of the printer. Go through the control panel menu option, and select printers. Right-click on the printer selection and choose "Share printer." You are now able to share the printer with any other computers on your network.
- Connect the secondary computer to the printer. Access the shared printer option from the secondary computer. Select "network neighborhood" and locate the primary computer. Double-click on the primary computer, and the shared resources will become available. Double-click on the printer. You can now utilize the printer from both computers.
Wednesday, June 23, 2010
How to Make a Printer Wireless?
 Having the freedom to use your home desktop or laptop anywhere in your house and then printing without the worry of connecting to a device is a reality today with the right equipment and setup. There are many ways to configure your device to print wirelessly. Each has its own pros and cons and the costs vary accordingly.
- Obtain a wireless print server that is compatible with both your wireless network and your printer. While the printer’s documentation may not explicitly say that it is compatible with a print sever, many are compatible, and this can be verified by checking the website of the print server’s manufacturer. If you have a multifunction printer, only the print function will work with most wireless print servers, though a few have recently added support for scanning and the printer’s other functions.
- Read all of the documentation that came with the wireless print server. The manual will detail the specifics of the installation routine.
- Connect the printer to the wireless print server via the USB cable. Connect the print server’s AC adapter and turn the unit on.
- Connect an Ethernet cable between the wireless print server and your computer. This will be used for the initial setup only.
- Insert the CD supplied with the print server into your CD-Rom drive. Start the software if it does not start automatically. The application will walk you through the installation process, which includes setting the unit’s IP address, setting an access password, configuring it to connect to the wireless network, installing the drivers that allow the print server to use the printer and installing the print drivers on your computers.
- Choose how your print server will be addressed. Most units are set up to use dynamic addressing by default, which means that your wireless router will assign an IP address to it. This allows the server to be easily installed on the network, but it also means that the IP address of the printer may change over time. The other option is to assign a static IP address to your print server. This option is more reliable, because the print server will always use the same IP address, making it easier for the computers to find the printer and easier to access the print server’s online configuration application. If your router has the IP address of 192.168.0.1, for instance, set the print server to something like 192.168.0.2 or 192.168.0.3, as long as another device does not use that address.
- Set a password to be used to access the unit’s online configuration application.
- Configure the print server to access your wireless network. Give it the same SSID network name as your router and set it to use the same wireless channel. If encryption is used on the router, enable encryption on the print server, and enter the encryption key or password.
- Follow the instructions given by the print server’s software for installing printer drivers on the unit.
- Disconnect the Ethernet cable and allow the unit to connect via the wireless network.
- Install the printing drivers on each computer that will use the printer.
- Access the print server’s online configuration application to verify all settings by entering the IP address of the unit into a web browser, using the “http://192.168.0.2” format. Enter the administrator name and password.
Tuesday, June 22, 2010
How to Install a Printer Without a CD?
Become frustrated over a lack of CD to install a printer. Now it's not a difficult task. Follow such simple steps to make installation easy:
- Place the computer and printer next to each other and make sure that all the wires are connected to both the printer and the computer.
- Turn the computer on and wait for it to boot up.
- Plug the printer into the wall and then take the USB cord that is attached to the printer and plug it into the appropriate port on the computer.
- Turn the printer on.
- Click on "Start menu" and go to the "Control panel".
- Find "Printers and hardware" box and click on it.
- Take mouse and click "Add printer".
- When you see "Welcome to the add printer wizard," hit "Next."
- Click "Automatically detect and install plug and play printer" on the add printer wizard page. Click "Next."
- Installing the printer will begin if the network can automatically detect it. Otherwise, the message unable to detect will pop up and you will be prompted to install the printer manually. Click "Next."
- Select printer port. Use the recommended port for best set up options. Click "Next."
- Pick manufacturer and printer. Click "Next."
- Type a name or confirm name if it appears in the box and set printer as default printer if wish. Click "Next."
- Print a test page to be sure printer is set up and online. Click "Next."
- Receive a successful completion of installation of printer message. Click "Finish."
Sunday, June 20, 2010
How to Print on 4X6 Photo Paper?
There are several ways to print on 4-by-6 photo paper. When purchasing photo paper, be sure to verify that the type you buy will work with your printer. Some types of glossy photo paper may be able to work only with inkjet printers. If the printer paper is used on the wrong type of printer, it is possible the printer may be damaged.
Follow these Steps to Print On 4X6 Photo Paper:
Follow these Steps to Print On 4X6 Photo Paper:
- Open Microsoft Word.
- Add the picture or information that you want to print to the photo paper. To add a photo to Microsoft Word 2007, follow these steps; 1) Click the "Insert" tab; 2) Click the "Picture" option in the "Illustrations" section (the "Insert Picture" window will appear); and 3) Browse your computer for the picture you want to add. When you find the picture you want to add, click on the "Insert" button in the "Insert Picture" window. The picture will be added.
- Click the "Office" button. Select the "Print" option.
- Click on the "Properties" button.
- Select the "Photo Printing-Borderless" option under the "Printing Shortcuts" tab.
- Select the "Paper Sizes:" drop-down box and select the "Borderless 4x6in." tab option.
- Click the "OK" button. This takes you back to the "Print" window. Click the"OK" button again. Your photo will print.
Friday, June 18, 2010
How To Fix Script Errors In Internet Explorer?
Method 1: Disable script debugging
If the only sign of a problem is the error message, and Web sites are working, you can probably ignore the error. Also, if the problem only happens on one or two Web pages, it might be a problem with those pages. If you decide to ignore the errors, you can disable script debugging.
Note If this problem occurs on more than one or two sites, do not disable script debugging. Go to method 2 now.
To turn off the Scripting Debugger in Internet Explorer 6, follow these steps:
1. On the Tools menu, click Internet Options.
2. On the Advanced tab, click to select the Disable script debugging check box. and then click OK .
To turn off notification about every script error in Internet Explorer 7, follow these steps:
1. On the Tools menu, click Internet Options.
2. On the Advanced tab, click to clear the Display a notification about every script error check box, and then click OK.
Method 2: Test a Web page from another user account, another browser, and another computer:-
Use another user account, another browser, or another computer to view the Web pages that triggered a script error to determine whether the problem persists. If the script error persists, there may be a problem with the way the Web page is written. You can probably ignore the error and disable script debugging as described in method 1.
If the script error does not occur when you view the Web page from another user account, browser, or computer, the problem may be caused by files or by settings on your computer. Go to method 3 to continue to troubleshoot.
Method 3: Verify that Active Scripting, ActiveX, and Java are not being blocked by Internet Explorer:-
Active scripting, ActiveX, and Java are all involved in shaping the way information displays on a Web page. If these are blocked on your computer, it may disrupt the display of the Web page. Reset the Internet Explorer security settings to make sure these are not blocked. To do this, follow these steps:
1. Start Internet Explorer.
2. On the Tools menu, click Internet Options.
3. In the Internet Options dialog box, click the Security tab.
4. Click Default Level.
5. Click OK.
Note ActiveX controls and Java programs are turned off at the High security level in Internet Explorer.
Try to open a Web page where you previously received a scripting error. If you do not receive the error, the issue is resolved. If the issue persists, go to Method 4.
Method 4: Remove all the temporary Internet-related files
Every time that you open a browser to view a Web page, your computer stores a local copy of that Web page in a temporary file. If the size of the temporary Internet files folder becomes too large, some display problems may occur when you open Web pages. Periodically clearing the folder might help resolve the issue.
To remove all the temporary Internet-related files from your computer when you use Internet Explorer 6, follow these steps:
1. Start Internet Explorer.
2. On the Tools menu, click Internet Options.
3. Click the General tab.
4. Under Temporary Internet files, click Settings.
5. Click Delete Files, and then click OK.
6. Click Delete Cookies, and then click OK.
7. Under History, click Clear History, and then click Yes.
8. Click OK.
To remove all the temporary Internet-related files from your computer when you use Internet Explorer 7, follow these steps:
1. Start Internet Explorer.
2. On the Tools menu, click Internet Options.
3. Click the General tab.
4. Under Browsing History, click Delete, and when you are prompted, click Yes to confirm.
5. In the Delete Browsing History dialog box, under Temporary Internet Files, click Delete Files, and when you are prompted, click Yes to confirm.
6. Under Cookies, click Delete Cookies, and when you are prompted, click Yes to confirm.
7. Under History, click Delete History, and when you are prompted, click Yes to confirm.
8. Click Close, and then click OK to close the Internet Options dialog box.
Source: support.microsoft.com/kb/308260
Thursday, June 17, 2010
How to Access Wireless Router Settings?
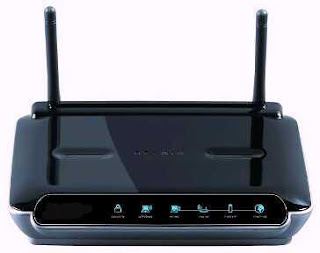 Accessing your wireless router's settings allows you to make changes to your wireless network's configuration and can help you to better secure your network. By connecting your computer locally to your router, you can view and update all of your router configurations directly through your computer's web browser. Although it can seem technically challenging to adjust your router settings, it is actually very simple to do and can be done in just a few minutes.
Follow these steps to Access your Router Settings:
- Connect your computer to the wireless router. Although you can access the router wirelessly, it is better to use an Ethernet cable to directly connect to your router so that you can securely adjust router settings. Plug the Ethernet cable into the appropriate Ethernet jack on your computer. Plug the other end of the cable into any one of the open Ethernet ports on the back of your wireless router.
- Open your computer's web browser. In the URL address field, enter the IP address for your wireless router. This information should be contained in your router's manual. If you cannot find it, enter "198.168.1.1" as the address. This is usually the default IP address for most routers.
- Enter the username and password for your router. This should also be supplied in the router's manual. If you don't have this information, go to routerpasswords.com and find the brand and model of your router. This site lists the default login information for most wireless routers.
- You should now be able to see your wireless router settings. You can configure your network ports, as well as SSID (wireless network name) and passwords.
Sunday, June 13, 2010
4 Most Common Computer Problems and their Solutions
There are thousands of problems that your PC could have, from an endless list of possible error messages to various hardware failures. Most of those problems might have several possible causes as well.
Luckily, the majority of these potential issues are rare. The problems most computer users see are common errors and failures seen by many, many others.
Below is a list of some of the most common PC problems:
Computer Won't Turn On
Finding that your PC won't boot is a very, very common problem. Whether you mean that the computer is completely dead or it powers on but nothing happens, the result is the same - you can't use your computer at all. It's scary.
Luckily there's a lot you can do to troubleshoot this problem.
Blue Screen of Death (BSOD)
There's a good chance you've heard of or seen the Blue Screen of Death. It's that all-blue screen with the computer code all over it that comes up as your computer "dies." It's actually caused a STOP Error and there are many different kinds. STOP 0x0000008E and STOP 0x0000007B are two of the more common Blue Screen of Death errors.
Browse through my complete list of STOP codes to find specific troubleshooting informatoin for the BSOD that you're seeing.
"404" / "Page Not Found" Error
A 404 error means that whatever page you tried to reach on the Internet isn't there. Usually this means that you didn't type the correct address in the browser or that the link you used to try to access the page was wrong.
Regardless of the reason, there are several things you can try to get past this common error.
"Hal.dll is Missing" Error
Error messages about missing DLL files are unfortunately very common but the "Hal.dll is Missing" error is one of the more common (and frustrating) ones. There are a lot of possible causes for this problem, meaning there are several troubleshooting steps you'll need to follow to cover all your bases.
Fortunately they're easy steps and with a little patience you'll have your computer back in no time.
Thursday, June 10, 2010
How To Install a Printer on Home Network?
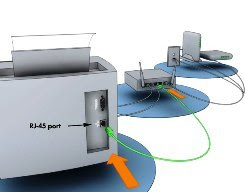 The most common way to install a printer on a home network is to install it as a stand-alone device on the network, and then add a connection to the printer on each computer that is on the network.
If you're not sure what type of network printer to install, decide if you want to:
1. Use a wireless printer. These printers use a built-in wireless card and plug into a power source, not your network or computer. After you turn on the printer, you need to refer to the information that came with the printer to set up a wireless connection to each computer on a home network. Security options for wireless printing are determined by each printer manufacturer.
2. Connect a printer directly to the network. To do this, you need to plug in the printer to your network hub or router. How to install these printers depends on whether the printer and your network device use an Ethernet, universal serial bus (USB), or another type of connection. You also need to refer to any installation information or tools provided by the printer manufacturer.
3. Connect more than one printer directly to the network. To do this, your hub or router must be able to support more than one printer connection.
To install a network printer:
1. To find out how to install a network printer, check the information that came with the printer.
To connect to a network printer :
After you have installed a network printer, you need to add a connection to the printer for each computer on the network.
1. Open Printers by clicking the Start button Picture of the Start button, clicking Control Panel, clicking Hardware and Sound, and then clicking Printers.
2. On the toolbar, click Add a printer.
3. In the Add Printer Wizard, select Add a network, wireless or Bluetooth printer, and then follow the steps in the wizard.
Monday, June 7, 2010
Fix Windows 7 Black Screen Error
1. Restart your PC
2. Logon and wait for the black screen to appear
3. Make sure your PC should be able to connect to the internet (black screen does not appear to affect this)
4. Press the CTRL, ALT and DEL keys simultaneously
5. When prompted, Click Start Task Manager
6. In Task Manager Click on the Application Tab
7. Next Click New Task
8. Now enter the command:
“C:\Program Files\Internet Explorer\iexplore.exe”
(Download Patch file) “http://info.prevx.com/download.asp?GRAB=BLACKSCREENFIX”
Note this command assumes that you are using internet explorer as your browser, if not substitute your browser path and file details for those of iexplore.exe or use the Browser option of Task manager to locate it.
9. Click OK and your browser should start up and begin the download process
10. When prompted for the download Click run, the black screen fix program will download and run to automatically fix the issue.
11. Now restart your PC and the black screen problem will hopefully be gone.
How to Configure the Router?
Open your web browser, type " http://192.168.1.1/ " into the address bar and hit "Enter."
Use "Admin" as the username in the pop-up box and leave the password blank.
Connect to the Internet and click on "Internet Setup."
Select your connection type from the drop-down menu. Choose "DHCP" for cable modems or PoE" for most DSL modems. If you are unsure of these options, check with your ISP.
Set a service set identifier (SSID) to identify the router and change the password.
Encrypt your wireless connection using a Wireless Encryption Protocol (WEP) key. Under the "Wireless Security" option, enter a passphrase and click "Generate." This will generate a password which will need to be used by any client connecting to your router.
Friday, June 4, 2010
How to Erase a Saved Password from an Email Account?
In Internet Explorer:
From your desktop, click to open up Internet Explorer.
Click on the "Tools" button on the menu bar. This option is in the upper left-hand corner of the web browser, directly underneath the address bar that displays the URL of the current webpage. From the drop-down menu that appears, click on the last option available, "Internet Options."
Click the button labeled "Delete" under the heading "Browsing history." In the window that pops up, click to check the box next to "Passwords." Proceed to click the button at the bottom of the window marked "Delete." Upon clicking this button, a window will pop up showing the browser's progress in deleting the saved passwords, and close automatically once complete.
In Mozilla Firefox:
From your desktop, click to open up Mozilla Firefox .
Click on the "Tools" button that appears on the menu bar located directly above the address bar. From the drop-down menu, click on the option labeled "Clear recent history."
Click on the button to the left of "Details." In the menu that appears, check the "Cache" and "Active Logins" boxes and click "Clear now." Firefox will clear the cache and close the window.
In Google Chrome:
From your desktop, click to open up Google Chrome.
Click the menu bar labeled "Tools" in the upper right hand corner of the Google Chrome browser. From the drop down menu, select the "Options" button, and click on the tab labeled "Personal Stuff." In this tab, click "Clear browsing data" from the list of options.
On the "Clear browsing data" screen, click on the "Passwords" box to select it. Click the button labeled "Clear Browsing Data."
Thursday, June 3, 2010
What's the difference between Spyware, Malware, Adware, & Trojan horses (& other viruses)?
*Virus is a program to cause damage to computer.
*Trojan is a program which is used to gain access to a computer by installing a program on infected PC to open some backdoor. [Trojans are also known as Backdoors].
*Worm is a program which infects the computers which are connected by some network. Worms slow down the network.
* Spywares are the program which are used to monitor/Log the activity performed on a computer. These are used to spy on some one either for legal or illegal perpose. Example: Keylogger applications.
* Adwares are the programs which delivers ads to your computer (generally in POP-UP's form). They consume your network.
*Malwares are the program with malicious intention. It can be damaging your computer, spying on you or any other malicious task.
Wednesday, June 2, 2010
How to remove Antispyware 2010?
From an uninfected computer, download Malwarebytes' Anti-Malware and the Registry Key Fix program.
Copy the downloaded files onto your USB flash drive. If you do not have a flash drive, you can alternately download the files and burn them to a disc. With the rogue program running, insert the USB flash drive or disc into the infected computer.
First, run the Registry Key Fix program. When Windows prompts whether or not you want to allow the data to be added to your computer, click on the Yes button.
Next, run the Malwarebytes' Anti-Malware setup. When the installation begins, keep following the prompts in order to continue with the installation process. Do not make any changes to default settings and when the program has finished installing, make sure you leave both the Update Malwarebytes' Anti-Malware and Launch Malwarebytes' Anti-Malware checked. Then click on the Finish button.
The program should automatically start after you hit the Finish button. You will see a message stating that you should update the program before performing a scan. Allow the updates to download. Once completed, you can click on the OK button and then you will be presented with the main screen of the program.
On the Scanner tab, make sure the the Perform Full Scan option is selected and then click on the Scan button to start scanning your computer for the rogue programs and any associated files.
Malwarebytes' Anti-Malware will now start scanning your computer for malware. Depending on the speed of your computer, this process can take anywhere from 5-15 minutes. When it is complete, a message box will appear stating "The scan completed successfully. Click 'Show Results' to display all objects found." Click the OK button.
You will now be back at the main Scanner screen. At this point you should click on the Show Results button. A screen displaying all the malware that the program found will be displayed.
Make sure that all of the check-boxes next to each of the "Vendor" names are checked and click on the Remove Selected button.
When the program has finished removing the malware from your computer, it will open a scan log and display it in Notepad. Review the log if you want, and then close it.
Close Your computer should now be malware-free and infection-free. You can remove the Malwarebyte's Anti-Malware program from your computer if you like, but you should keep the files on your flash drive or keep the disc that contains the files, in case of future infections.
How to Install HP Wireless Printer?
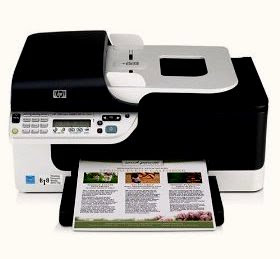 Wireless HP printers are good for multiple computer networks or offices. Multiple computers can wirelessly connect to and print from the same printer.
Follow the steps to install your HP Wireless printer:
Insert the CD that comes with the wireless HP printer into any computer that will use the printer. This will allow to setup the initial software and allow you to configure the initial network settings.
Choose where to install the software and which components of the software to install. Typical components for HP printers include the network utility and project creation software. If you already have software for project creation, you don't need to install this. You won't need to install either component for other computers in order to use the printer.
Turn on the HP printer when prompted. Don't connect it to a computer unless directed by the software. If the printer isn't recognized by the software, you may be asked to temporarily connect it via a provided USB cable.
Choose a printer name and an IP address. The IP address can be dynamic or you can create a static IP address. For larger networks, dedicate a static IP address or allow the HP software to choose a static IP for you to prevent conflicts on your network.
Press "Continue" to complete the wireless HP printer installation. The entire process can take up to 30 minutes if you install all software components.
Install the printer on other computers by going to "Start -- Printers and Faxes -- Add a Printer." Choose "A Network Printer" to view a list of network printers. Choose the printer name to install and access the wireless printer.


