Showing posts with label Printer. Show all posts
Showing posts with label Printer. Show all posts
Thursday, August 12, 2010
Monday, June 28, 2010
How to fix a printer paper jam?
Fixing a printer paper jam
When working with any printer it's inevitable that you'll encounter a paper jam. Below are the steps you'll want to follow when this occurs.
1. Turn off the printer.
2. Inspect the location or tray the printed paper ejects to. If the stuck paper is visible manually remove it.
3. Remove all paper trays and any paper that may be stuck between the tray and the printer. If the stuck paper is visible manually remove it.
4. Open the printer door that allows you access to the printer ink cartridges or toner and look for any stuck paper. If the stuck paper is visible manually remove it.
5. Turn the printer back on. If you continue to receive a printer jam error try repeating the above steps again. If issue still persist and you see no paper that is stuck in the printer it's likely your printer is experiencing another hardware issues and we suggest contacting the printer manufacturer for additional assistance and/or repair.
To manually remove paper pull on the paper with both hands being careful not to tear the paper while pulling it. If you're unable to get to an edge of the paper that allows you to pull it you may need to manually rotate the gears that feed the paper through the printer.
Preventing a printer paper jam
As mentioned earlier it is inevitable that you will encounter at least one paper jam during the life of your printer. However, if you're encountering frequent paper jams following the below steps can help prevent paper jams from occurring.
1. If your printer has a paper tray do not fill the tray to capacity. If you're encountering frequent paper jams reduce the amount of paper you place in the tray each time it is filled.
2. Make sure you or the tray feeding the paper into the printer is aligned properly and/or the slider used to hold the paper in place in the tray is snug with the paper. Many printers have sliders that allow different types and sizes of paper to be fed into the printer. If the slider is not properly positioned it can cause paper jams.
3. Use standard office paper; folded paper, paper with labels, and specialty paper such as hard bound paper can often cause paper jams. If you're uncertain with what type of paper you should use with your printer your printer documentation will list the types of paper compatible with your printer.
4. Do not mix the types of paper you're feeding into the printer at one time. If you need to change the type of paper or size of paper being used removed any other paper currently in the printer before inserting the new paper.
5. Examine the printer for any previous stuck paper in the printer. Previous paper jams, torn paper, printing labels or other foreign objects in the printer can cause reoccurring printer jams.
NTQP2CP36PPC
Thursday, June 24, 2010
How to Connect Two Computers to One Printer?
Choose your method for sharing the printer. You have the choice of establishing a network or setting up a print server. Setting up a print server requires more hardware in addition to setting up a network, while solely setting up a network cuts down on clutter in your office.
There are the steps to Follow to connect two computers to one printer:
There are the steps to Follow to connect two computers to one printer:
- Connect the primary, or first, computer to the printer. This is done traditionally with a printer cable linking the primary computer to the printer. If this is the first time the computer is hooked up to the printer, be sure to follow the manufacturer's instructions for installation and setup.
- Change the settings on the primary computer to allow sharing of the printer. Go through the control panel menu option, and select printers. Right-click on the printer selection and choose "Share printer." You are now able to share the printer with any other computers on your network.
- Connect the secondary computer to the printer. Access the shared printer option from the secondary computer. Select "network neighborhood" and locate the primary computer. Double-click on the primary computer, and the shared resources will become available. Double-click on the printer. You can now utilize the printer from both computers.
Tuesday, June 22, 2010
How to Install a Printer Without a CD?
Become frustrated over a lack of CD to install a printer. Now it's not a difficult task. Follow such simple steps to make installation easy:
- Place the computer and printer next to each other and make sure that all the wires are connected to both the printer and the computer.
- Turn the computer on and wait for it to boot up.
- Plug the printer into the wall and then take the USB cord that is attached to the printer and plug it into the appropriate port on the computer.
- Turn the printer on.
- Click on "Start menu" and go to the "Control panel".
- Find "Printers and hardware" box and click on it.
- Take mouse and click "Add printer".
- When you see "Welcome to the add printer wizard," hit "Next."
- Click "Automatically detect and install plug and play printer" on the add printer wizard page. Click "Next."
- Installing the printer will begin if the network can automatically detect it. Otherwise, the message unable to detect will pop up and you will be prompted to install the printer manually. Click "Next."
- Select printer port. Use the recommended port for best set up options. Click "Next."
- Pick manufacturer and printer. Click "Next."
- Type a name or confirm name if it appears in the box and set printer as default printer if wish. Click "Next."
- Print a test page to be sure printer is set up and online. Click "Next."
- Receive a successful completion of installation of printer message. Click "Finish."
Sunday, June 20, 2010
How to Print on 4X6 Photo Paper?
There are several ways to print on 4-by-6 photo paper. When purchasing photo paper, be sure to verify that the type you buy will work with your printer. Some types of glossy photo paper may be able to work only with inkjet printers. If the printer paper is used on the wrong type of printer, it is possible the printer may be damaged.
Follow these Steps to Print On 4X6 Photo Paper:
Follow these Steps to Print On 4X6 Photo Paper:
- Open Microsoft Word.
- Add the picture or information that you want to print to the photo paper. To add a photo to Microsoft Word 2007, follow these steps; 1) Click the "Insert" tab; 2) Click the "Picture" option in the "Illustrations" section (the "Insert Picture" window will appear); and 3) Browse your computer for the picture you want to add. When you find the picture you want to add, click on the "Insert" button in the "Insert Picture" window. The picture will be added.
- Click the "Office" button. Select the "Print" option.
- Click on the "Properties" button.
- Select the "Photo Printing-Borderless" option under the "Printing Shortcuts" tab.
- Select the "Paper Sizes:" drop-down box and select the "Borderless 4x6in." tab option.
- Click the "OK" button. This takes you back to the "Print" window. Click the"OK" button again. Your photo will print.
Thursday, June 10, 2010
How To Install a Printer on Home Network?
 The most common way to install a printer on a home network is to install it as a stand-alone device on the network, and then add a connection to the printer on each computer that is on the network.
If you're not sure what type of network printer to install, decide if you want to:
1. Use a wireless printer. These printers use a built-in wireless card and plug into a power source, not your network or computer. After you turn on the printer, you need to refer to the information that came with the printer to set up a wireless connection to each computer on a home network. Security options for wireless printing are determined by each printer manufacturer.
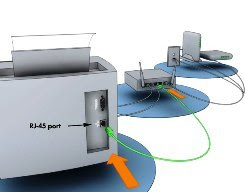
2. Connect a printer directly to the network. To do this, you need to plug in the printer to your network hub or router. How to install these printers depends on whether the printer and your network device use an Ethernet, universal serial bus (USB), or another type of connection. You also need to refer to any installation information or tools provided by the printer manufacturer.
3. Connect more than one printer directly to the network. To do this, your hub or router must be able to support more than one printer connection.
To install a network printer:
1. To find out how to install a network printer, check the information that came with the printer.
To connect to a network printer :
After you have installed a network printer, you need to add a connection to the printer for each computer on the network.
1. Open Printers by clicking the Start button Picture of the Start button, clicking Control Panel, clicking Hardware and Sound, and then clicking Printers.
2. On the toolbar, click Add a printer.
3. In the Add Printer Wizard, select Add a network, wireless or Bluetooth printer, and then follow the steps in the wizard.
Wednesday, June 2, 2010
How to Install HP Wireless Printer?
 Wireless HP printers are good for multiple computer networks or offices. Multiple computers can wirelessly connect to and print from the same printer.
Follow the steps to install your HP Wireless printer:
Insert the CD that comes with the wireless HP printer into any computer that will use the printer. This will allow to setup the initial software and allow you to configure the initial network settings.
Choose where to install the software and which components of the software to install. Typical components for HP printers include the network utility and project creation software. If you already have software for project creation, you don't need to install this. You won't need to install either component for other computers in order to use the printer.
Turn on the HP printer when prompted. Don't connect it to a computer unless directed by the software. If the printer isn't recognized by the software, you may be asked to temporarily connect it via a provided USB cable.
Choose a printer name and an IP address. The IP address can be dynamic or you can create a static IP address. For larger networks, dedicate a static IP address or allow the HP software to choose a static IP for you to prevent conflicts on your network.
Press "Continue" to complete the wireless HP printer installation. The entire process can take up to 30 minutes if you install all software components.
Install the printer on other computers by going to "Start -- Printers and Faxes -- Add a Printer." Choose "A Network Printer" to view a list of network printers. Choose the printer name to install and access the wireless printer.


